According to Market.us, the global embedded systems market was valued at $91.3 billion in 2022 and is projected to reach $173.4 billion by 2032, growing at a CAGR of 6.8% from 2023 to 2032.
The persistent growing demand for multi-core embedded systems is promoting the application of advanced technology. The concept of virtualization has initiated a revolution in the electronics industry and the embedded system is holding the core of this revolution.
An Embedded System is a combination of Hardware and Software designed to execute various functions for real-time and non-real-time applications. The designing and integration of software and hardware are equally important to run the system efficiently.
For an embedded system, where developing the software application and integration with hardware is crucial and complex, the designer must not avoid the concernment and extraordinary precautions to design hardware for embedded systems.
In this blog we will learn the design process of embedded system in details.
Steps of Embedded hardware design
Design process of embedded systems is a step-by-step process that requires careful planning and consideration. Let’s dive into each step in more detail:
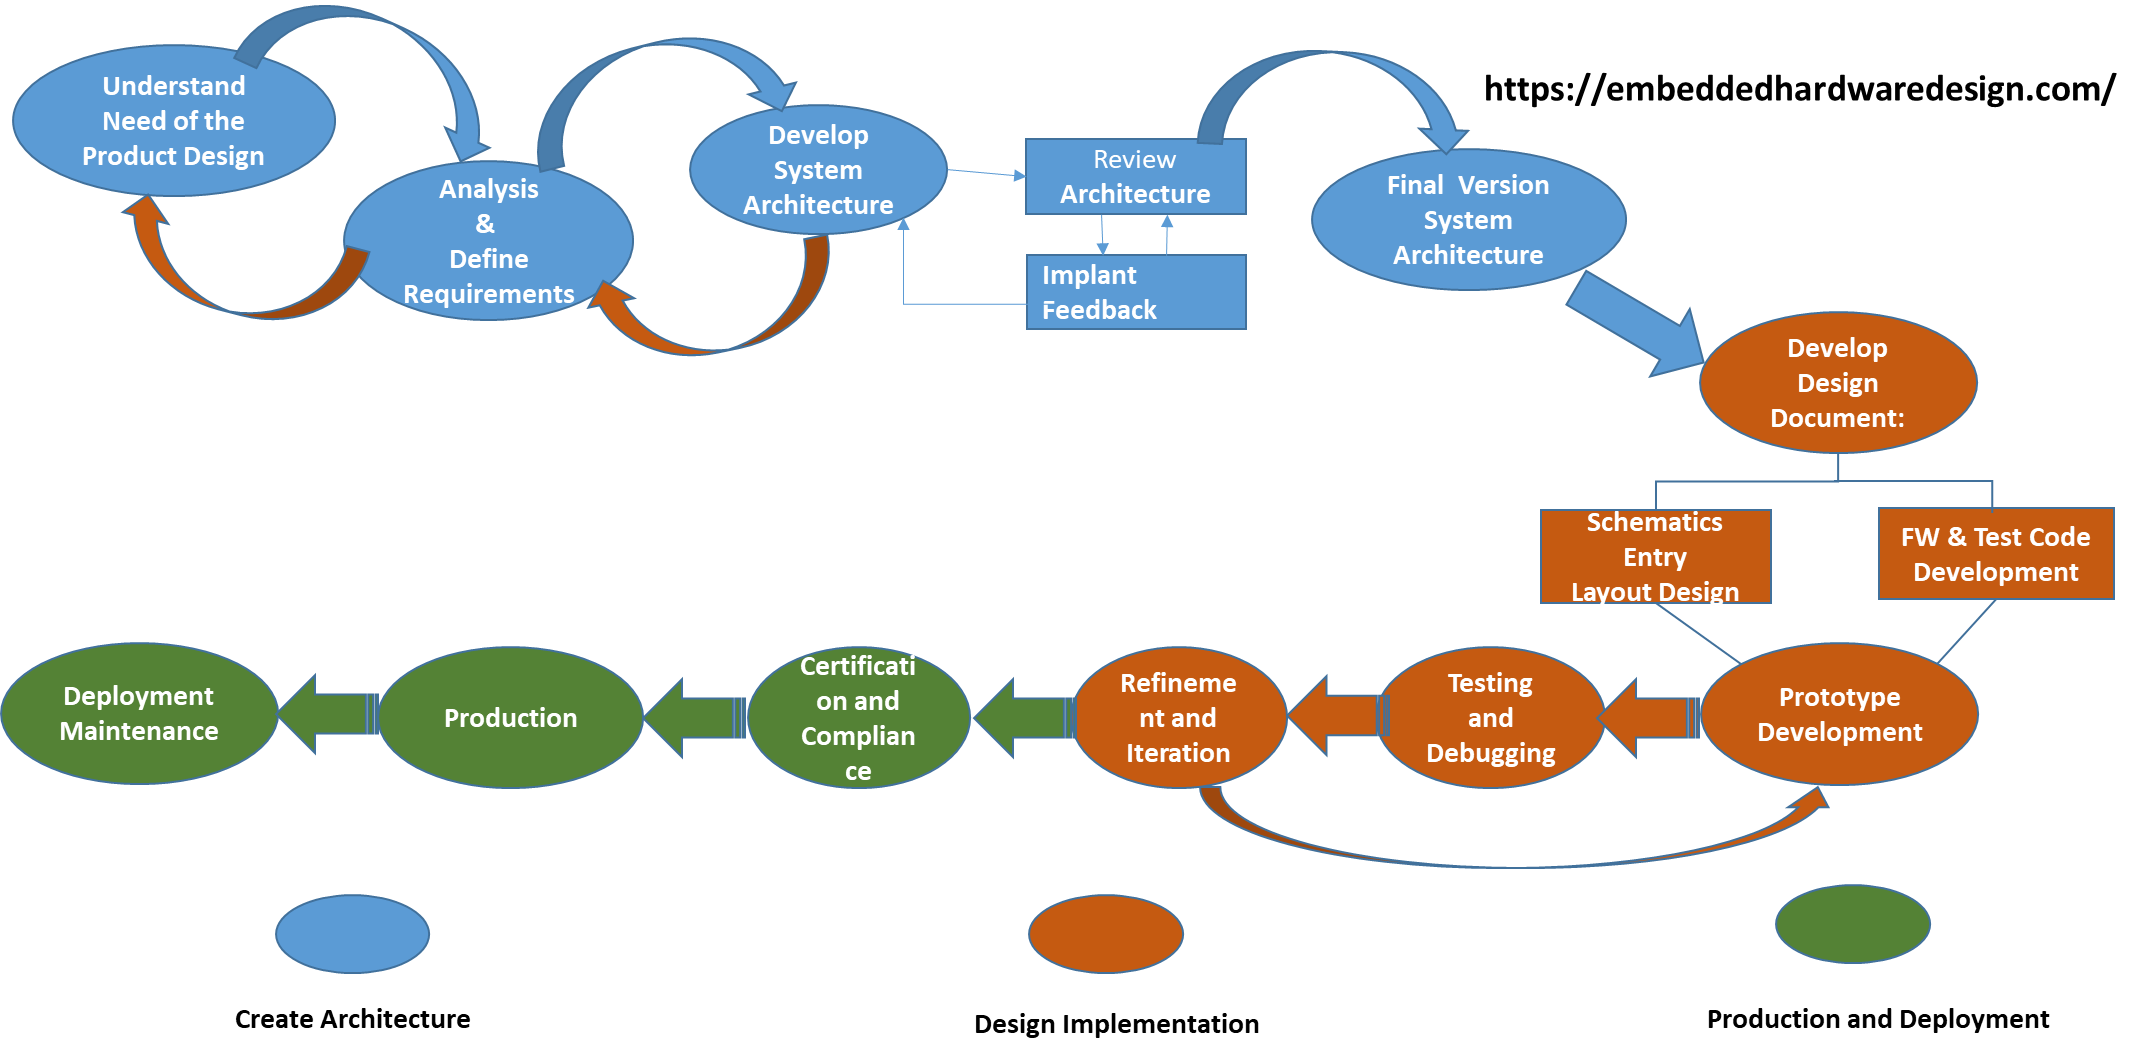
STEP 1: Need of the Product Design:
It is important to understand the need for the product, application, Integration with the overall System, and opportunity for that product in the current market. Identify the target market segment, analyze the current market offerings, and identify any gaps or opportunities for differentiation that the embedded product can leverage
Also read: What are the Components of Embedded System Hardware?
Here’s a step-by-step guide to identifying the need, target market, and opportunities for differentiation:
- Define the Purpose and Application:- Clearly define the purpose and intended application of the embedded product. Identify the problem it aims to solve or the task it needs to perform within the larger system.
- Identify Target Market Segment:- Determine the target market segment for the product. This involves analyzing potential customers, industries, or sectors that can benefit from the product’s features and functionality. Consider factors such as size, growth potential, and specific needs of the target market.
- Analyze the Current Market:- Research and analyze the existing market offerings related to your product. Identify competitors, their products, and their market positions. Evaluate the strengths and weaknesses of these products to gain insights into the market landscape.
- Identify Gaps and Opportunities:- Compare the current market offerings with the identified target market segment. Look for gaps or unmet needs in the market where your embedded product can provide unique value. These gaps represent opportunities for differentiation.
- Leverage Product Differentiation:- Determine how your embedded product can differentiate itself from the existing market offerings. This could be through innovative features, improved performance, enhanced reliability, cost-effectiveness, or any other unique selling points that cater to the identified gaps in the market.
- Consider Integration with the Overall System:- Evaluate how the embedded product will integrate with the overall system or ecosystem it will be a part of. Consider compatibility requirements, communication protocols, interoperability with other devices or software, and any specific standards or regulations that need to be met.
- Conduct Market Research and Validation:- Validate your assumptions and market opportunities through market research. This can involve surveys, interviews, focus groups, or other research methods to gather feedback from potential customers, industry experts, or stakeholders. Use this feedback to refine your product design and value proposition.
STEP 2: Define Requirements:
Clearly define the requirements for your embedded hardware system. Brainstorm on functionality, performance, power consumption, Environmental Factors, Safety, Regulatory Standards, Interfaces, Connectivity, Maintenance, Upgradability, Reliability, Quality, size, cost, and any specific constraints or standards that would be required to design the product.
By clearly defining the requirements upfront, you establish a solid foundation for the design process and ensure that the resulting embedded hardware system meets the desired specifications and expectations.
STEP 3: Develop System Architecture:
Developing a system architecture for embedded systems involves designing the structure and components of the system to ensure that it meets the desired functionality, performance, and reliability requirements. Based on the requirements, you need to develop a high-level system architecture.
STEP 4: Component selection:
Component selection is a critical aspect of embedded system development as it directly impacts the system’s performance, functionality, cost, and reliability. Identify the major components, their interconnections, and the overall system flow.
Consider the choice of microcontroller/microprocessor, memory, sensors, actuators, communication interfaces, and power supply.
STEP 5: Design Document:
Design documentation for embedded systems provides a comprehensive overview of the system architecture, design choices, interfaces, and specifications. It serves as a crucial reference for the development team, stakeholders, and future maintenance efforts.
Although it may require time and effort to create, the quality of the design depends on the thoroughness and depth of this technical document. The design documentation includes a bidirectional matrix of requirements to ensure that all requirements have been considered and that none are overlooked. This matrix acts as a valuable quality control tool, verifying that the system design aligns with the specified requirements.
By investing the necessary time and effort into creating comprehensive design documentation, teams can establish a solid foundation for the development process. This documentation acts as a vital reference throughout the project lifecycle, facilitating effective communication, collaboration, and future maintenance activities.
Moreover, the design documentation serves as an essential input for the schematics design phase. It provides the necessary information about the system’s structure, functionality, and performance requirements, enabling the development team to create detailed schematics that accurately represent the system’s design.
STEP 6: Schematic Design:
Create a schematic diagram that represents the electrical connections between components. Select appropriate components based on their specifications and compatibility with the system requirements.
Pay attention to factors such as voltage levels, current requirements, and signal integrity. In the electronics industry, several popular schematic design tools are widely used, such as Autodesk Eagle (previously known as CadSoft Eagle), KiCad, Altium Designer, Allegro Cadence, OrCAD, and CircuitStudio.
STEP 7: PCB Layout Design:
PCB (Printed Circuit Board) layout design is a critical step in the development of embedded systems. It involves designing the physical layout of the PCB, including the placement of components, routing of traces, and ensuring proper signal integrity and manufacturability.
Once the schematic is complete, designing the Printed Circuit Board (PCB) layout starts. Component Placement: Signal Routing: Route the traces that connect the components according to the system’s electrical requirements and constraints. Ensure proper impedance matching, signal integrity, and separation of sensitive analog and digital signals.
Follow good routing practices such as avoiding sharp bends, minimizing trace lengths, and adhering to design rules provided by the PCB manufacturer.
STEP 8: Prototype Development:
Fabricate a prototype of the PCB by sending the PCB layout files to a manufacturer. Assemble the components onto the PCB, including the microcontroller, sensors, connectors, and any other required elements. Double-check the connections and ensure that the hardware is properly soldered.
Prototype development is a crucial phase in the development of embedded systems as it allows for testing and validation of the system’s functionality, performance, and feasibility before moving on to mass production.
STEP 9: Firmware Development:
Firmware development is a critical aspect of embedded system development as it involves programming the software that runs directly on the microcontroller or microprocessor of the embedded system.
Firmware is responsible for controlling the hardware, implementing the desired functionality, and enabling communication with external devices or systems. Use an Integrated Development Environment (IDE) and appropriate programming languages/tools for your chosen hardware platform.
STEP 10: Testing and Debugging:
This involves powering up the PCB, testing its basic functionalities, validating the hardware and firmware integration, and ensuring the system operates as intended. Test the embedded hardware system to verify its functionality and performance.
Use appropriate testing methodologies such as unit testing, integration testing, and system-level testing. Debug any issues or unexpected behavior that arise during testing.
STEP 11: Refinement and Iteration:
Based on the testing results, refine the hardware design, firmware, or software as necessary. Iterate through the testing and refinement process until the system meets the desired specifications and performance criteria.
STEP 12: Certification and Compliance:
Certification and compliance of embedded hardware are essential to ensure that the products meet regulatory standards, safety requirements, and industry-specific certifications. Compliance demonstrates that the embedded system adheres to specific guidelines, regulations, and standards set by regulatory bodies or industry organizations.
If you’re embedded hardware system needs to meet specific standards or certifications (e.g., safety, electromagnetic compatibility), ensure that the design and manufacturing process adheres to the required guidelines. Perform necessary testing and documentation to demonstrate compliance.
STEP 13: Production:
Once the design is finalized and validated, prepare for production by optimizing the design for manufacturing. Work with a manufacturer to mass-produce the PCBs and assemble the components. Ensure that the production process follows industry best practices and quality control measures.
STEP 14: Documentation:
Document the design, including specifications, schematics, and firmware/software details. It is a critical aspect of embedded system development as it provides essential information about the system’s design, functionality, and usage.
Proper documentation ensures that stakeholders, developers, and users have a comprehensive understanding of the embedded system, facilitating efficient development, maintenance, and troubleshooting. It’s important to note that designing embedded hardware can be a complex task, requiring knowledge in electronics, PCB design, firmware development, and testing.
It’s advisable to consult with experts or engineers experienced in embedded systems design to ensure a successful outcome. These documents are the final deliverable for the customers.
STEP 15: Deployment and Maintenance:
Deployment and maintenance of embedded systems involve the processes of deploying the system in the target environment and ensuring its proper functioning throughout its lifecycle.
Deploy the embedded system in its intended environment and monitor its performance. Provide ongoing maintenance and support as needed, including addressing any issues or incorporating updates or upgrades.
Important Points to Remember:
- Understand the need, purpose, and application of the embedded product that you are planning to design.
- Conduct market research, analyze existing market offerings, and Identify gaps and opportunities for differentiation
- Clearly define the requirements for the embedded hardware system design
- Develop a system architecture based on the requirements
- Select components, including MPU/MCU, memory, discrete components, sensors, actuators, communication interfaces, and power supply
- Create comprehensive design documentation
- Design the schematic diagram. You may use any of the popular tools like Autodesk Eagle, KiCad, Altium Designer, OrCAD, or CircuitStudio
- Design the PCB layout, ensuring proper component placement and signal routing
- Fabricate a prototype PCB
- Develop firmware for the microcontroller or microprocessor
- Test and debug prototype PCB
- Refine the design based on testing results
- You may need to obtain certification and compliance as necessary
- Prepare for production and optimize the design for manufacturing/Production
- Document the design, specifications, schematics, and firmware/software details
- Deploy the embedded system in the target environment and Provide ongoing maintenance and support throughout the lifecycle.
Conclusion:
Hardware plays a crucial role in the functioning and effectiveness of embedded systems. The designing of a robust hardware platform and selection of appropriate hardware components are essential to ensure the system’s stability, performance, power efficiency, and real-time responsiveness.
Hardware considerations such as processing power, memory capacity, input/output capabilities, and robustness directly impact the system’s overall functionality and reliability. Additionally, optimized hardware design can lead to reduced system cost, size, and power consumption.
Thus, the importance of hardware in embedded systems cannot be overstated, as it forms the backbone of these systems, enabling them to perform their designated tasks effectively and efficiently.
Author Profile
- 20+ years embedded hardware design professional with a burning passion for teaching. Sharing the intricate world of embedded hardware is my mission and joy.
Latest entries
 Tech Updates30 November 2025STM32WBA6: The Next-Generation MCU Powering Secure Short-Range Wireless Designs
 Blogs24 November 2025High-Speed PCB Layout Design Guide-104
 Tech Updates14 September 2025Renesas Launches RL78/L23 Ultra-Low-Power MCUs to Power Smarter Home Appliances
 Blogs7 September 2025High-Speed PCB Layout Design Guide-103